

Designing the ultimate EDC knife
I made the very first Beekeeper as a gift for my Dad's Birthday. I wanted a blade shape that would be useful in a variety of situations. As he used the knife, he found it very useful as a hive tool when tending to his bees. Thus it became the Beekeeper.

My goal with this knife was to design the ultimate Everyday Carry blade. It needed to work in a variety of situations, be easy to carry, and quick to access. It needed to handle hard and brutal environments, be large enough to tackle bushcraft or survival tasks, and it would need to be a viable self-defense tool. In theory, this would be THE go-to knife. With all this in mind, I began the intensive design process:
Everyday Versatility
Hard Use
Self Defense
Serviceable
Tradeoffs:
Design isn’t linear and it’s full of tradeoffs. To make my life easier I focused on creating the perfect tool for ME. Designs by committee often result in products that nobody likes, therefore, I focused on the wants and needs of one user, me.
As it turns out, many in the knife community share my same point of view, and appreciate my design language. So I thank you! I would have had no idea the Mini Beekeeper would become Dull Boy Blades' flagship model!

Step 1: Start with the handle
I knew I needed to make the knife smaller but just scaling it down in every dimension wouldn’t work. I had to reevaluate the knife completely, while maintaining the features that made the original work so well. Starting with the handle, it needed to be long enough to afford a full grip and thick enough for a secure grip, while also being short and thin enough to carry comfortably. A knife that is too big and heavy simply doesn’t get carried. For comparison, it is similar to the compromise all of us make when choosing to carry a gun for self-defense. Bigger has more capacity, less recoil and is easier to shoot, but smaller is lighter and easier to carry and conceal. Many of us, myself included, land on the Glock 19 (or similar size model from any other manufacturer). The finger grooves on a G19 generation 4 fit my hand perfectly for reference.

I landed on this length for the handle because it was large enough for me to get a confident grip in every blade orientation with no extra. Just enough, in this case, is the idea solution.

Scales:
There is a constant tug of war going on in the design of scales as well. If you want to use your knife comfortably for hours on end, you need a smooth handle that fills your hand as much as possible. If you want maximum grip, you need an aggressive texture that will bite into your hand, bordering on discomfort. If you want to comfortably carry this knife you want the handle to be thin and minimal so it doesn’t add bulk and weight. Clearly, we have a triangle of compromises here where we can never maximize all three, let alone any two. So, we must make a decision, luckily, we have our scope of what this blade needs to do, and that should not include maximizing comfort for extended periods of time. So, we can make the handle smaller and grippier, but not too small because we still need to get a secure purchase for harder use situations. You can skeletonize a knife that is super low profile and great for light tasks like opening packages, but this won’t afford a solid grip for hard use or self-defense situations.

The size and texture is a happy medium that checks all of my boxes. Textured enough for a secure grip, large enough in hand to feel stable yet small enough to comfortably carry and conceal. The sacrifice here is mostly the situation where you are carving wood for hours. However, here are other tasks where you might use the blade for hours but in a lighter grip for more finesse. Skinning a large animal for example, in which case a grippy handle can be advantageous when your hands of covered in blood.
 Offering multiple texture options also allows the user to choose based off of their needs and preferences.

Another important grip feature is at the front of the scales, where the sheath grabs on. I designed this crevice to be large and locate the sheath well. This is a topic most users never think about but significantly effects the quality and the feel of the retention. The retention and the quality of the retention of your sheath has a lot to do with the shape of your scales. The goal is to have predictable release and reinsertion with good feedback as well as longevity. For example, if your retention is holding on to some part of the blade, like a finger stop, and that finger stop has any sharp edges, this will dig into your Kydex and likely alter the strength of the retention over time. For this reason, we smooth the retention portion of the scales to maximize the scale to sheath consistency over time.


This swell at the front of the scales also gives the user a physical reference and hand stop in the width direction. This paired with the finger choil in the blades profile work together to prevent your hand from sliding down the blade when piercing.

That finger choil was one decision that had no tradeoffs for me, it serves as a finger stop, and helps locate the orientation of the blade without needing to look. By taking the blade to the full width, where the grip terminates, this allows you to use the blade against flat surfaces. The choil itself is also oversized and the transition between it and the rest of the handle is rounded to not force your fingers into any unnatural positions and prevent hot spots. So, we have enough of a choil to orient the blade and stop your hand from sliding forward while also allowing for multiple grip orientations. This is where simplicity prevails. I love the Howler, but if we compare the grip features, we can see that the extra features on the Howler, while serving their purpose, limit the ways we can comfortably grip the handle. Both of these knives were designed with self-defense in mind but one prioritizes grip security, the other, versatility.

Blade:
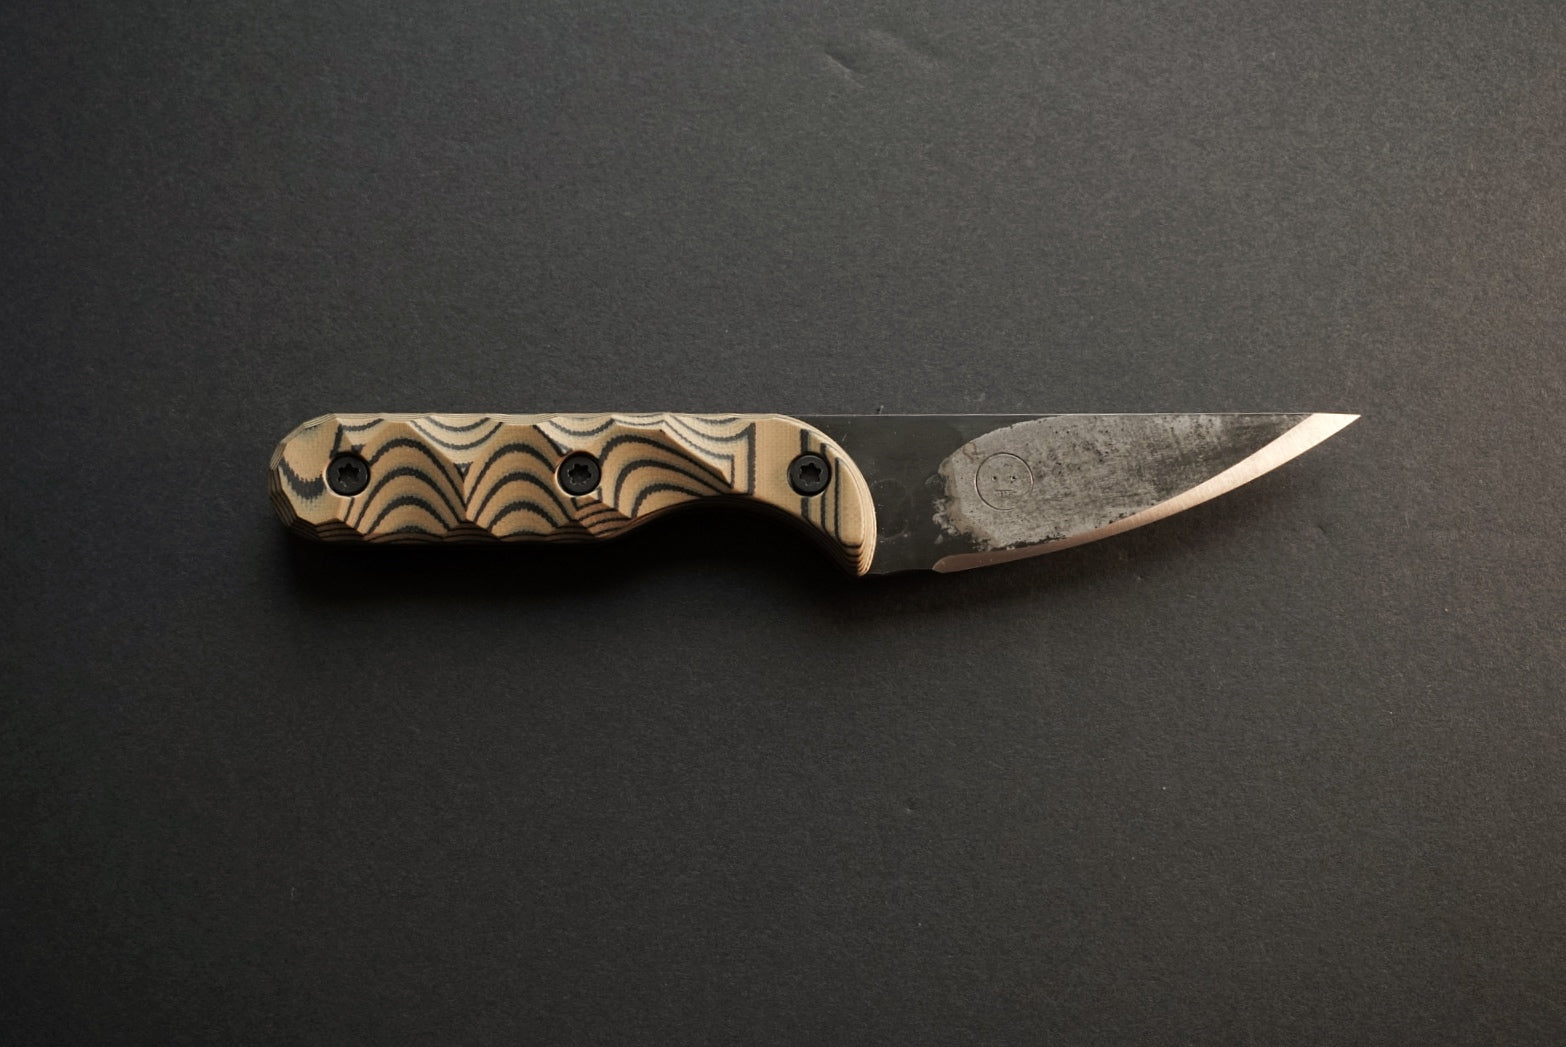
Now let's talk about the blade! The length and shape of the blade came after the size and shape of the handle so that we could keep things physically and visually balanced. The 3.25” blade length is likely frustrating to those who live in places with stupid knife laws that preventing the lawful carry of blades over 3”. I apologize, the blade just didn't look or feel right at that length, turns out a quarter inch makes a big difference 😉.

I modified the shape of the blade over time to be pointier, this aids in penetration which is desirable in a self-defense blade but also for everyday tasks. For example, when you are opening a package, that sharp tip requires less force to penetrate the tape, then sliding the edge through the tape is a breeze, this gives you a ton of control and ends up being safer. This is what people mean when they say a sharp knife is a safe knife, the less force required in a cut the more control you have. Think back to physics class, potential energy can turn into kinetic energy real fast and even a dull knife with a bunch of kinetic energy can be deadly.

So, the pointy tip is good for everyday tasks and self-defense, however it unfortunately reduces the strength for hard use tasks. Thats where we can get a bit creative with our geometry to minimize that tradeoff. You've probably noticed the tapered edge; this is a function with the thickness of material behind the edge. The angle of the grind does not change, the primary bevel angle doesn’t change either. The primary bevel is traditionally ground parallel to the edge of the knife, giving you a consistent thickness at the edge from the base of the blade to the tip. What we have chosen to do is to make our primary bevel converge with the edge of our blade at the very tip. This leaves the spine of the knife at full thickness right up to the tip, giving us more material at the tip creating a stronger and more rigid blade. Essentially, we have a full flat grind at the base of our blade that tapers to a Scandinavian grind at the tip. This solution allows us to maintain a super pointy tip that is great for fine work and penetration while also maintaining toughness and rigidity.


Our plunge line is something I am quite proud of, grinding bevels is the most challenging part of knife making for me. We have put considerable effort into developing a process to consistently achieve this shape. The shape itself serves to minimize stress points, you can imagine a vertical plunge line with a hard transition from flat to bevel. This would create a weak point at the base of the blade which would create the potential for a catastrophic failure. I also think the curve gives the blade visual balance on top of the functional reasons.


You may have also noticed the lack of sharpening choils on my blades. This was a conscious decision on my part, removing the choil adds strength, since this is a possible failure point, it prevents snagging of garments and other media and it looks better visually. The Mini Beekeeper prototype had a sharpening choil and I realized it’s disadvantages while working as a bike mechanic. We had boxes of old disgarded clothes that were used as rags. I was constantly catching the choil on these shirts which would stop the cut dead in its tracks. I ended up covering the choil with the webbing of my hand to stop this from happening. I considered this a lesson learned and removed them from my designs.

Materials:
I like to use proven steels that are super tough and easy to maintain. For high carbon steel I opt for 80crv2 and 52100, in stainless I choose AEBL and Nitro V. All of these steels have high toughness and are easy to sharpen. I try to offer a good mix of high carbon and stainless for people in different environments and preferences. Being able to maintain your edge, wherever you are is important, all knives get dull eventually, you should be able to put a sharp edge back on it with minimal effort. That’s why I don’t offer this knife in more designer steels, it's all about priorities when it comes to tradeoffs. I may use different steels in future designs, but for our use case with this knife, these steels make sense.

G10 and Micarta are my go-to handle materials for their durability. They don’t swell or crack and can be machined into precise shapes. I prefer to use G10 over Micarta, even though it can be nasty stuff to work with. It is incredibly durable and wears so well. If you scratch or scuff g10 a bit of oil will make the blemish virtually disappear ensuring your knife looks good for years to come.

Sheath:
Sheath:
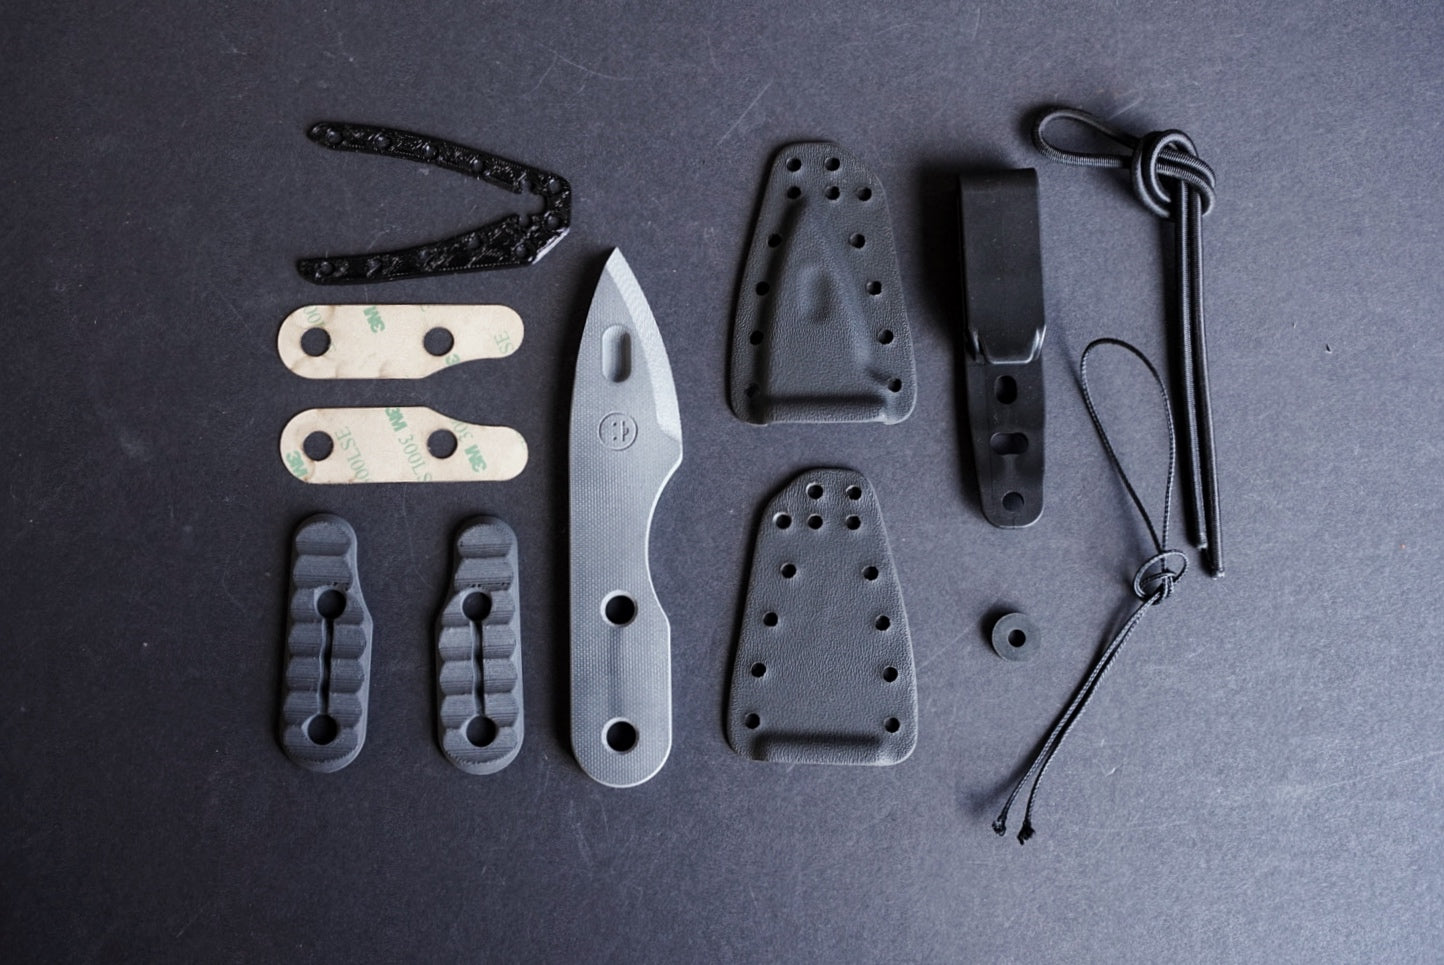
A good sheath will never make a bad knife good, but a bad sheath can make a good knife completely un-carriable. The sheath for this knife needed to be versatile just like the blade, while remaining sleek and unobtrusive. Designed around the Discreet Carry Concepts Mod 9 clip the sheath works well in the pocket or inside the waistband, where the DCC clip does its job of staying attached, no matter what.
The sheath strikes a balance between versatility and form factor. While including some handy features you might not have noticed but likely appreciated without realizing:
- Flared opening: like a competition mag-well on a handgun, this gives you a wide opening for the knife to slide into and prevents your clothing from covering the opening when the knife is out of the sheath.
- Thumb ramp: angled to be ergonomic and reduce the hot spots when carrying inside the waistband. This gives you the option of a controlled and subtle release from the sheath.
- Generous blade clearance: The blade cavity is much wider than the width of the blade. This prevents the sheath from scratching your blade while allowing for operation even if there is dirt or debris inside of the sheath.
- Anti rattle divot: There is a small divot designed to pinch the tip of the blade at the end of the sheath preventing the loud rattling of the knife inside of the kydex. This design eliminates the need for additional materials like felt or leather inside of the sheath that could get cut and bound up inside the sheath.
- Adjustable retention: dial in your perfect retention with the turn of a screw. We also added a second hole for your retention hardware if you ever needed to really lock the knife down. We did all of this without adding bulk or unnecessary complexity to the sheath.
- Rounded edges: Because we care about your comfort, we round all of the edges on our sheaths. The only sharp bit should be the knife inside of the sheath!
So, you have a ton of options with the standard sheath, but I know that some of you would prefer to carry the knife deeper in the pocket. Well, we have you covered with our deep carry sheath. Ambidextrous and made with convenience in mind, the deep carry sheath dives you a carry system that feels much more like carrying a standard pocketknife while still giving you quick access to your tool. The construction of this sheath is something we developed for the Negative Zero slip originally and utilizes shock cord. This allows you to replace the clip, if it ever gets damaged, without replacing your entire sheath. The Cordura brand shock cord also gives you the ability to tighten or loosen the retention.
Ecosystem:
With the proven usefulness of the MINI BEEKEEPER design, I knew I wanted to expand the ecosystem to fit any environment. The deep carry sheath was a big step in that direction and required a ton of trial and error outside of the box thinking. Maybe I’ll make a video about that journey sometime.

Unfortunately, you can’t carry your knife everywhere, but you should still be protected, self-defense is a human right after all. Enter the G10 MINI BEEKEEPER, a non-metallic self-defense tool designed to get places steel tools can’t. In same versatile shape of the steel MB.
 What if you wanted to safely train? We got you! The MB trainer is the same construction as the G10 MB but with no sharp edges making it a durable and safe training tool. Keep in mind you could still hurt your training partner with this tool in force-on-force training, so use accordingly.


The trainer serves as a training tool for both the g10 and steel MB. It fits the same sheath as the G10 MB but if you wanted to put a metal clip on it so that it is more analogous to the steel MB sheath, you can replace the plastic clip with a DCC mod 5.1. This will give you a carry position just like the standard steel MB sheath.

You can now carry the Mini Beekeeper however and wherever you like with the combination of these options. It has taken us some time to build out this ecosystem, but I am proud of how far we have come. I am incredibly grateful of all of your support, in this brand and the Beekeeper designs, you have enabled us to create these solutions. American small business and small-scale manufacturing is very much alive thanks to your conscious buying decisions. Thank you!

Final Thoughts:
The Mini Beekeeper was designed to be functional in a myriad of environments, but I also wanted it to look good. I think that there is plenty of room to make tools both aesthetically pleasing and extremely functional. If you had the option to have both, why compromise!
I made the Mini Beekeeper for everyday problems, from the mundane to the extreme, so that you can be a problem solver.
Now go SOLVE PROBLEMS!
-Jonah

Leave a comment
This site is protected by hCaptcha and the hCaptcha Privacy Policy and Terms of Service apply.